
Dive Light Genie Electronics
Making an L.E.D dive light? New design for LED's in a Mag-Lite and Check out the LED Genie LED Driver
| Page 1 | Page 2 | Page 3 |
What you need to know before ordering parts
and building the light. |
How to build the canister dive light with lots
of pictures. |
Dive Light Genie Electronics Info. |
 |
Copyright The entire design including (but not limited to) pictures, pcb, source code and this web site of the dive light genie is copyright 2005 Matthew Skinner. I'm happy to discuss licensing agreements with manufacturers so please use the contact details on this site if you wish to discuss copyright and patent matters. |
Overview
The dive light genie is an advanced light dimmer and battery monitoring circuit for any kind of canister dive light, or for that matter any kind of light setup based around a 5 to 24 volt globe. Unlike some dimmers that waste the higher voltage by turning it into heat, the extra voltage through the use of advanced technology is saved by the dive light genie for use later on in your dive to extend the burn time of your light. This is only one of the many advantages that allows you to enjoy your dive for longer without worrying about when your light is going to fail. Other benefits are a more steady brightness, and constant color which is great for video and photography as the white balance won't change as much over the dive. You don't want the colors in your footage or shots to be inconsistent from the start of your dive to the photos/video taken at the end of the dive.
The dive light genie features a backup LED1 in case the main light source fails and a second LED2 or buzzer which will warn you of a low battery and acknowledge any button/switch presses. This buzzer can also be used to communicate with other people underwater as an added use as sound travels a lot further underwater than light can. The mounting of the piezo can effect how useful this feature is underwater.
The dive light genie also solves another problem related with using rechargeable batteries, this is a warning that the power in the batteries is about go flat. Normally, users of lights don't notice the gradual dimming of the dive light until its too late and battery damage has already begun to occur. The dive light genie will give some warning for you to find your buddy/surface or to have your backup light at the ready. The genie also features battery monitoring to protect from over discharge, which in an unprotected battery will reduce is life and capacity. Yet another way the dive light genie will ensure your light burns for the longest possible time as a damaged battery will not last as long.
If you need further time you also have the choice to dim the light to 50% (half brightness) for example to double the burn time of your light at any point of time during your dive. This is like being able to take out your 50 watt globe and put a 25 watt globe at any time during a dive! 25% dimming can also used for use above water to slow down overheating for lights that need to be used only underwater, as part of the low battery warning, or anywhere a soft low level of light is needed like checking gauges at a deco stop.
To protect the globe and lower failure rates of the globe at turn on, the power to the light is ramped up (soft start) and 25% dimming can be used to preheat the filament to prevent a cold globe from being damaged by high voltages if your overdriving the light. Globe filaments will break just like a cold glass will when hot water is poured into the cold glass, a short 25% dim at the start of your dive will greatly reduce if not prevent this from occurring.
 |
Click on the video screen below to see a demo of the Dive Light Genie in action on youtube. |
Benefits
- Can be fitted to any dive light, not just for diy or overdriven lights.
- A longer burn time due to unique regulation features and other little known tricks at getting the most out of a battery like recovery extension and others.
- A more steady light and color, great for consistent photography and video.
- The choice to dim the light to get even longer burn times, or to use the light on land for a longer time before a dive.
- Battery protection to prevent over discharge.
- Low battery warning with multi stage reminders to ensure you don't forget if you turn the light back up.
- Lamp protection through the use of Lamp Feedback, soft start and preheating.
- Buzzer for signaling as sound travels a long way underwater.
- Backup LED lighting in case globe fails, also allows you to be recognized in a large group of divers if canister mounted in a visible place. Each Diver can have their own color.
- Fits easily into most canisters due to very small size.
- Less maintenance due to less holes and seals in canister if the piezo or reed type switches are used.
Usage
Connect the battery to the board, the LED2 or buzzer which ever one you chose to use will turn on for around 1 second to indicate power is applied. Then if the battery is not low the LED1 will remain on and the LED2/buzzer will go out. It will remain in this state until you activate the switch. NOTE. Because a torch with a big globe gets very hot its critical that you only connect the battery just before going on a dive. Never connect it before hand because if the light turns on accidentally the light will get very hot and can easily melt and damage nearby gear and possibly cause a fire. The same applies when you have finished your dive, remove the battery when the light will not be used any more.
The switch then triggers the LED2/buzzer when the contacts are closed to give you an indication the switch was triggered and also to allow you to send basic signals underwater. The light will change levels in reaction to button pushes in a similar fashion to a touch lamp, ie first push is low then medium and then high, the next switch trigger will turn the light off again and the cycle can be repeated over and over.
Battery Protection can be difficult to grasp before you have actually used a dive light genie as it has multiple stage warnings to ensure that you don't forget the battery is getting low. As the dive light genie extends your burn time dramatically, this puts all of the low warnings past where the same light without a D.L Genie fitted would have already gone flat.
Specs
- Size: The board is 30mm by 28mm and can range in height depending on wire routing and the parts used, usually around 15-20mm. If a buzzer is fitted its also marginally larger on one corner. A smaller version is also available on request.
- Input Battery voltage: Can accept up to 24 volt MAX input with higher packs supported if you request a custom build.
- Current draw: Around 10mA due to the LED which is used for backup lighting, if the LED is removed it draws less than 1mA.
- Max Light Current: Up to 20 amps with a heat sink which increases the size, or around 9 amps without a heat sink allowing 100 watt globes to be used before heat sinking is needed.
How to Order
Ordering is very simple, just pay via paypal using the below 'pay now' buttons if your not in Australia, or if you are then email me for direct deposit details.
I also need to know the following information before I can send out the dive light genie kit.
- What type of batteries are you using, nimh/sla/nicd/lion and how many cells or voltage ?
- What type of switch does your light use, ie Reed, toggle or push button with rubber boot, piezo or a mechanical switch that requires the light head to be rotated.
- Your postal address ?
'Dive Light Genie' dimmer for HALOGEN based lights (can be made for HID on request)
| Dive Light Genie Kit
(All parts supplied in kit form) |
|
Premade Dive Light Genie (Already assembled)
|
Now the premade DLG is supplied with screw terminals as standard so no soldering is required to install into your light, only a screw driver is needed. |
Building Information
Premade Dive Light Genies are available now, as well as the kits that I offer for those who can solder and wish to provide the labour to assemble the units..
Parts List
These parts will need to be purchased in addition to the kit which only includes 2 parts and a pcb, see pictures in next section for more info. The reason for this is to keep postage costs down and also some people dont want a buzzer or wish to choose their own LED color.
| Qty | Part Description | Part Markings |
| 1 | 7805 voltage regulator, can be a TO220 or a TO92 package as its low current. If its not the larger and more common to220 package then tripple check the pinout as some are 'back to front'. | 7805 |
| 1 | 0.1uf ceramic cap | Will be marked "104" |
| 1 | 4.7uf Tantalum cap, 16 volt. | One side will be marked + positive so make sure its around the right way. |
| 1 | 1N4001 diode, or any 400x series will do. | |
| 2 | 270 ohm resistors 1/8 watt, 1/4 watt will also just fit but larger sizes will not. | red, violet, brown, gold (4 bands). red, violet, black, black, brown (5 bands). |
| 1 | 100K resister metal film 1% 1/8 watt, 1/4 watt will also just fit but larger sizes will not. | brown,black,black,orange,brown (5 bands) or brown black yellow gold (4 bands) |
| 1 | 22K resister metal film 1% 1/8watt, 1/4 watt will also just fit but larger sizes will not. | red, red, black,red, brown (5 bands) or red, red, orange, gold (4 bands) |
| 1 | LED any color you like with 3mm and 5mm sizes fitting the pcb. | One side is flat on the LED and this side is marked on the PCB. |
| 1 | PCB mount DC buzzer with 7mm pin spacing or a buzzer with two leads to solder to the board. Can be left off or a second LED used in its place. example buzzer is found here | Make sure it works on DC and 5 volts. |
To work out the resistor colors use this helpful link 5 band Resistor Color Code Calculator
Building the dive light genie electronics
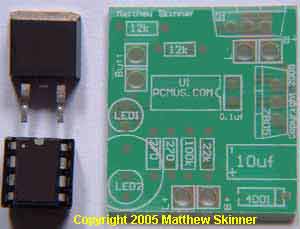 |
These 3 parts is all that's included in the kit unless you request other parts to be sent at the time of ordering. This keeps postage down and allows people to not have to pay for a buzzer or LED's if they dont want to. A list of extra parts you will need is found above which you can order and source the parts whilst waiting for the kit to arrive in the post. |
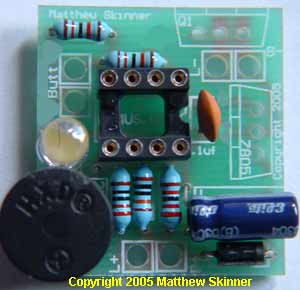 |
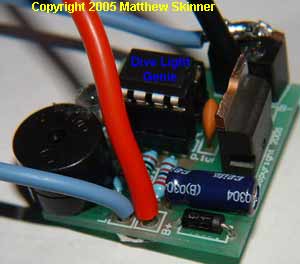
Most of the parts in this picture are in place, with the IC socket empty ready for the Dive Light Genie U1 chip. I used all metal film resistors which is the reason why the resistors are blue and have 5 rings of color on them. You dont need to use metal film if you cant find them. |
 |
At this stage power should be applied without the DL Genie IC installed and by using a multi-meter you should check that the 5 volt regulator is working correctly and the IC is receiving no more than 5 volts on any of its pins. If you don't have a multi-meter then apply power without the chip in the socket for 5 seconds and then check out how cool the 7805 voltage regulator is running. Beware if using a to92 package 7805 as some have the pins around the wrong way so please always check the data sheet for your brand of 7805. The TO220 is always only ever found with pins in the 1 order so if in doubt just use a to220 and cut the top off it if its height is a problem (see next pic for a to220 with the top cut off). |
|
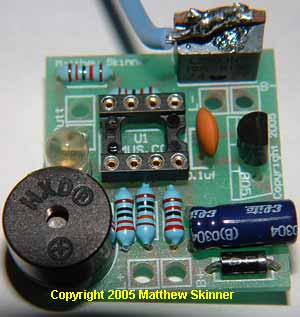
Here's the fully assembled dive light genie which takes around 20 minutes to build. Its very important to always remove the U1 genie IC and the globe whenever you make a change to the PCB and check that...
If one of those 2 things happens then it can damage the U1 Genie chip so ensure that you make this quick check before powering the pcb with the DL Genie installed. |
Blue LED backup light
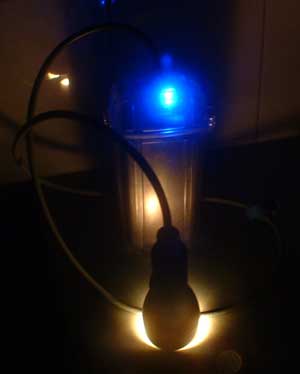 |
Here's the Dive Light Genie showing off a blue LED for its backup light. Blue light can bring out Fluorescence underwater which you would have missed with a white light. If the globe blows or the batteries are too low to power the main light then this can also be used as a redundant light source. It should not replace a backup torch as canister flooding will take out both sources of light. A single LED is not very bright without a lens to focus the beam so this should never be counted as a backup light, it can be a very useful way for your buddy to find you in a group of divers are night time if the canister is mounted in a visible place. |
Electronic FAQ
- Are these available premade ? Yes these are now being produced by a manufacter and available in retail outlets, contact me for your nearest store.
- Can I use a reed switch or another way to turn the light on and off ? Yes any type of switch can be used from a reed switch in the canister or light head to a normal toggle switch. Switches that some commercial lights use that require the end of the light head to be rotated as a switch can even be used. Info on my piezo switch idea, click here. Schurter Part # 1241.2411.7
- How deep have you tested the piezo switch ? I've done numerous dives past 40 meters and the maximum so far is 49.5 meters, the switch worked exactly the same at depth as it does in the demo video at the surface.
- How reliable are the electronics? Its made with the same type of technology as any digital gauge or dive computer which are widely accepted and used in the dive industry for many years now. As it looks after the globe and battery it can make your light more reliable against battery damage and premature globe failure. Always dive with a backup torch as per padi and other agencies recommendations for the type of diving that you are doing.